GENERAL
Steel H-Piles shall be rolled from high-strength low-alloy Columbium-vanadium structural steel, meeting the requirements of Article 2501 and 4167 of the Standard Specifications and the requirements of ASTM A 572 Grade 50 and shall have cross section dimensions meeting the current edition of ASTM A 6 for the section number designated.
Steel H-Piles shall be free of injurious defects, shall have a smooth finish, shall be uniform in thickness and shall be true to dimensions, weights, and required thickness.
Steel H-Piles shall be properly identified with heat number, size, length, and mill identification / name marked on each pile.
Steel H-Piles shall be from domestic origin, melted and manufactured in the United States.
SPLICING/WELDING STEEL H- PILE
Field welding of steel H- pile shall conform to the requirements of IM 558 and preapproved welding procedures requiring the use of backing plates. Only field welds are permitted and only at air temperature above 0˚ F. Pre-heating shall be required. Welding shall be performed by a state certified field welder.
MONITORING INSPECTION
1. Minimum sample rate frequency - one sample per source per size per year.
2. The District Materials Engineer will coordinate sampling by checking the H-pile database for sources and sizes previously sampled and tested in the current calendar year.
3. Samples shall be properly identified by heat number, source and size, and shall be accompanied with their respective Mill Test Report. Sample information will be recorded electronically as soon as the sample is secured.
4. Sample size shall be a full cross-sectional area of a minimum 1.5 ft. in length.
5. Field Material personnel shall secure the sample from the project site with all required information (mill test report, monitor inspection form documentation).
6. The contractor shall be responsible for cutting the required sample.
7. Samples will be processed in the Central Laboratory and shall be measured for width and depth, dimensional compliance and weighed for compliance with ASTM A6 Specifications of ± 2.5% of the theoretical or specified amounts.
CUT-OFF PILE PIECES
Pile cut-off pieces shall be accepted on the basis of Mill Test Report and proper identification (heat number and source). Welding of pile cut-off pieces shall conform to the requirements of IM 558. It is the contractor’s responsibility to have the cut-off pilings properly identified, marked and to possess all required paperwork (Mill Test Analysis and Laboratory Test Report). Un-identified cut-off pile pieces shall not be accepted (heat number, source, and mill test report).

|
(FOR CENTRAL LABORATORY’S USE) |
|||||||
|
DIMENSIONS & TOLERANCES FOR WEIGHT COMPLIANCE |
|||||||
|
H-PILES - ENGLISH |
|||||||
|
|
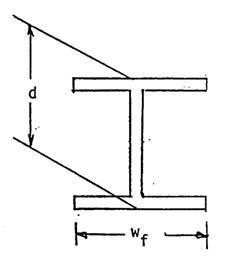
Depth, d |
Flange Width, wf
|
Min. Acceptable Weight Lbs./Ft. 0.975 Theoretical |
||||
|
Designation |
Min. |
Theo. |
Max. |
Min. |
Theo. |
Max. |
|
|
|
In. |
In. |
In. |
In. |
In. |
In. |
|
|
HP 14 x 117 x 102 x 89 x 73
HP 12 x 84 x 74 x 63 x 53
HP 10 x 57 x 42
HP 8 x 36
|
14 1/8 13 7/8 13 3/4 13 1/2
12
11 5/8
9 7/8 9 5/8
7 7/8
|
14 1/4 14 13 7/8 13 5/8
12 1/8
11 3/4
10 9 3/4
8 |
14 3/8 14 1/8 14 13 3/4
12 1/4
11 7/8
10 1/8 9 7/8
8 1/8 |
14 11/16 14 9/16 14 9/16 14 7/16
12 1/16
11 13/16
10 1/16 9 15/16
7 15/16 |
14 7/8 14 3/4 14 3/4 14 5/8
12 1/4
12
10 1/4 10 1/8
6 1/8 |
15 1/8 15 15 14 7/8
12 1/2
12 1/4
10 1/2 10 3/8
8 3/8 |
114.08 99.45 86.78 71.18
81.90 72.15 61.42 51.68
55.58 40.95
35.10 |